Tuesday, May 25, 2010

Crochet Video Tutorials

I just love video tutorials!
By all means I am not taking the credit for any of the video links I have supplied. In fact I am so pleased to give the credit to those who have made them.
These video's take time, equipment, programs, dedication, more time and the generosity to share them all with us all.
Thank You to all the producers of these, I hope to return the favor one day.

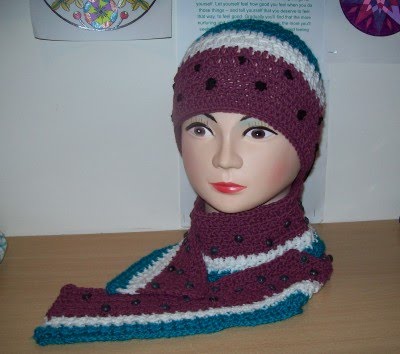
I'm so excited about this first video, the stitch that is shown here is what I know as the griddle st or the up and down st. I make my neck warmers out of this st, but I do one extra thing! I include a ch 1, at the end of every row, I start with a sc and end with a dc as the video shows. My beginning ch row is 13 ch, skip first ch, sc, dc, sc dc, ending with the dc and ch 1 to step up to the next row.
By doing that 1 ch, I do not have to crochet a border around the neck warmer as the ch 1 keeps it nice and firm!
Lemon peel st.

This is the first time I have heard of Jacobs Ladder!
Enjoy.

Cat's In A Row.
I have a written pattern for this but thought it was way too difficult until I saw this video.

This video is showing the basket weave pattern, how ever I wanted to post it for the fpdc and bpdc instructions.
Front post double crochet, Back post double crochet.


Now that you have seen fpdc, try using the st in a cable, here is a video for the cable st.


I've never seen this st before either, just wondering how I could make it work in a hat.
Streamer crochet.

Oh no, wait for it, there is a hat pattern on youtube for the streamer crochet!


Well that is just a few for today, thank you to all the video makers and my viewers!

Just one more thing before I go, I love this guy who also makes video tutorials, take a peek!

Woop, woop, woopy do!

Just a quick post to say a big thank you and hugs to all for responding to my return to crochet post! I am so chuffed! Thank you, thank you, thank you!
Cat is very happy!

Monday, May 24, 2010

My Journey Back To Crochet

When you are ill, it is not at all surprising that you do not feel inspired to do those simple things that you love. That is what happened to me. Amongst many other things, my love for crocheting diminished, I ceased my involvement with knit and crochet groups and forums and stopped blogging too. I really felt the loss of crocheting and tried many ways to ignite the passionate flame I once had. I thought it may have to do with being in a new house and not feeling comfortable in my new craft room. I changed the room around many times, I bought a better rocker recliner, went through my yarn stash and pattern books to no avail.
I thought of a better storage solution for my yarn and asked my husband to build pigeon holes in the built in cupboard in the room, which he did. I thought this would help me, being able to see every type of yarn I had on hand, but no!
I was simply too ill for it to matter and I wish now that I had been a little bit kinder to myself at that time.
So what actually inspired me?
My daughter wanted a neck warmer, she said she would buy me some new yarn as she had a specific colour in mind. I went to search for something that I may already have made. I came across a large box of finished crochet items that I made to sell at the markets almost 2 years previously.
To be quite honest I was a bit taken back when I looked upon those items that I had made. Wow, I thought, these are really good, no wonder people bought them, I usually feel quite uncomfortable when receiving a compliment, but I allowed myself to feel good about what I was seeing! It may also have been the pleasant scent of the perfumed soaps I had packed with my crochet items to keep them smelling nice.
My daughter did purchase some yarn for a neckwarmer, she also found a lovely blue that she wanted a hat and neckwarmer made in too. Well okay I thought, best getting to make it, then zip! The first neck warmer was made, then zip,zip, the blue hat and neckwarmer were made! Wow that was quick I thought, what next?
I quickly got onto the internet for some inspiration, something easy I thought, I'll try youtube. I sat in front of my computer with yarn and hook and followed some easy tutorials, I was crocheting along side of another person making hats and scarves! Due to the level of medication I am taking, I find it difficult to concentrate reading patterns, I was really looking for some refresher courses as it was almost 12 months since I had been crocheting!
I was making so many crochet items that I found the courage to go back to the market and sell again, which I did this week-end just passed!
The pictures below show what I have made in the past 3 to 4 weeks, where possible I will supply a link, the other items were created on the go, unfortunately I am unable to write patterns for now.
The Cat Is Back, Woo Hoo!

The storage, before and after.

Ear flap hat, no pattern.

Cup Cake Hat

My dog had a hair cut so I made
him a coat.
This was my first attempt, a bit small.

Ear Flap Hat, no pattern.


Pink beret, no pattern.


Those spiral scarves.

Watermelon Hat and Scarf


Ear flap hat, no pattern.


A long spiral scarf.


Hat and Scarf


Beret, no pattern.


Hat no pattern.


Watermelon hat and scarf, see above version for pattern.


Star st Hat and neckwarmer


Hat and neckwarmer, pattern for hat, pattern for neckwarmer


Hat and neckwarmer, no pattern.


Beret and scarf, no pattern.


Fuzzy topped hat, no pattern.

This was made to order! Woo hoo, my first order in ages.


Simple sc hat, spruced up with the spike stitch and some nice buttons, no pattern.


Cable hat.


I used a similar style st for the cable hat to create a cable beret shown here in black.

I hope that you enjoyed my post, see you again real soon :)

Yarnocturnally

Waffle Stitch Hat and Scarf Set
Pics are clickable to see full image


Materials:
Worsted weight yarn in two colors
I hook for set, J hook to attach fringe
Yarn needle for weaving ends
Paperback book for fringe
Scissors


Scarf:
Make chain in multiples of 4 +3 till chain is the length you want the scarf to be.
Row 1: Sc in each chain to end, fasten off. Join second color, ch 3 turn.
Row 2: Dc in next st, ch 2, sk 2 st, *dc in next 2 st, ch 2, sk 2, dc in next 2 st* to end. Fasten off (leave several inches, this will be added to the fringe later), join first color Ch 3, turn.
Row 3: Dc in next st, going behind the chain two, *trc in next two st, dc in next two* to end. Fasten off, join second color, Ch 3, turn
Repeat rows 2 and 3 as many times as needed to get the width you want. Do one row of sc in the color you started with.
Wrap both colors of yarn around a paperback book (or a VHS tape) a whole bunch of times (I didn’t count, I just wrapped till I was bored lol) slide yarn off book, cut the whole bunch across the bottom.
Using a J hook, attach two strands of each color across the width of the scarf on both ends. Now give the fringe a bit of a haircut so it’s nice and even across =)
Hat:
Note: do first two rounds in one color, after that, alternate colors each row. For this part I just carried the dropped color along and crocheted over it.
Row 1: Ch 1, 6 sc in ring; join to 1st sc.
Row 2: Ch 1, 2 sc in each sc across. Join. (12st)
Row 3: Ch 1, (2 sc in next sc, 1 in next) around. Join. (18st)
Row 4: Ch 1, (2 sc in next sc, 1in next 2) around. Join. (24st)
Row 5: Ch 1, (2 sc in next sc, 1 in next 3) around. Join. (30st)
Row 6: Ch 1, (2 sc in next sc, 1 in next 4) around.
Join. (36sts)
Row 7: Ch 1, (2 sc in next sc, 1 in next 5) around. Join. (42sts)
Row 8: Ch 1, (2 sc in next sc, 1 in next 6) around. Join. (48sts)
Row 9: Ch 1, (2 sc in next sc, 1 in next 7) around. Join. (54sts)
Row 10: Ch 1, (2 sc in next sc, 1 in next 8) around. Join. (60sts)
Row 11: Ch 1, (2 sc in next sc, 1 in next 9) around. Join. (66sts)
Row 12: Ch 1, (2 sc in next sc, 1 in next 10) around. Join. (72 sts)
Note: An easy way to determine where to stop increasing. Measure across the circle.
For a head size 18” around it should be 5 - 5.5” across
Pre-teen and teen 20-22” it should be 5.5 - 6”
Ladies 21-23” it should be 6.5 - 7.5”
These are rough measurements I took to make it easier to use different hook/yarn sizes or stitches. Just be sure that the row you end on is a multiple of four and the waffle will work out just fine.
(still alternating colors, only now you won’t be carrying the dropped color. Just drop it and pick up the next color, it won’t be noticeable from the outside and from the inside it looks rather like a whip stitch… you can cut the yarn each row if you like to weave a lot of ends… I don’t!)


Row 13: Ch 3, dc in next st, ch2, sk 2 st, *dc in next 2 st, ch 2, sk 2, dc in next 2 st* to end. Join with sl st using next color.
Row 14: Dc in next st, going in front of the chain two, *trc in next two st, dc in next two* to end. Join with sl st with next color.


Repeat row 13 and 14 till hat covers ears.
Last two rows: sc in each st around with the color you started with. Fasten off, weave ends.